TECHNICAL QUESTIONS
Basically, MelodEar is developing 3 complementary practices and skills:
- Fluency in improvising in any melodic mode you would like to work on.
- Fluency in accurately crossing modes when the harmony changes, and the ability to develop improvisations over the chord changes of any song, thanks to a deep understanding of the melodic transitions between modes.
- Developing a totally responsive Harmonic Ear.
These are the main goals, but consistent work with MelodEar will also bring some cool side effects, such as:
- Preparing for or deepening your music sight-reading skills.
- Becoming proficient at identifying intervals.
- Developing your musical imagination melodically.
- Creating a clear visual map for improvisation if you are a singer.
- Building a stronger connection with your instrument if you are an instrumentalist.
This chapter will give you a very simple overview of the workflow, without going into details.
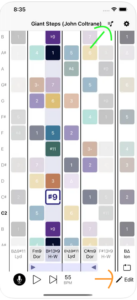
- THE SESSION WINDOW is where you will practice. By default, MelodEar opens to your last session.
- From there, you can navigate to the LIBRARY (green arrow) or the EDIT WINDOW (orange arrow).
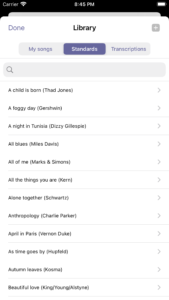
- THE LIBRARY is where you choose the tune you will work on, with 3 sections: ‘My Songs’, ‘Jazz Standards’, and Transcriptions.
From there, you can select a song from your ‘My Songs’ library, choose a jazz ‘Standard’, or create a new song by tapping the + button.
THE EDIT WINDOW is where you can create the content of your songs, such as choosing chord changes and selecting a melodic mode for each chord.
The Edit Window operates in two sections:
- The Chord Progression Section (on the left) allows you to edit your chord progression on a larger scale (shift chords, copy, or transpose entire sections of the song).
- The Mode & Chord Section (on the right) lets you edit your chords and select your modes.

When you sing in the Session Window, MelodEar displays the square of the pitch you are singing , like this :
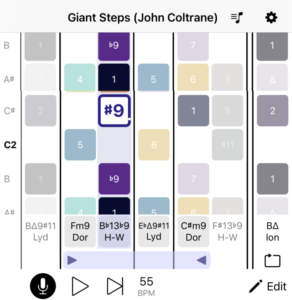
If the pitch you sing is not displayed, please check the following points :
- Make sure the mic icon is ON (black) like this :
 (IOS)
(IOS)  (Androïd)
- In the SETTINGS : Make sure the auto-scroll is ON
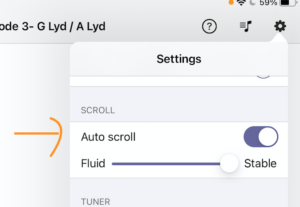 ( it could just be that the note you are singing is off the current screen)
- Make sure your headphones are recognised by your device. Make sure you use official quality headphones and adapters for everything to work smoothly
- Make sure you are not in the free version of MelodEar
Provide your e-mail when the pop-up opens, or just contact us at : melodeardavid@gmail.com
1.Press the Mode>Chord button in the Edit Window

2.Choose a mode in the mode list ( you can preview each mode by tapping on its name) :
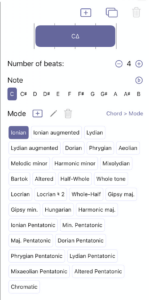
When you are ready for more advanced understanding of the Edit Window, see chapter How do I choose chords and modes
For starters, it is much easier that you start with a single-mode practice to figure out the basic process of MelodEar, before handling multiple-chord/mode tunes.
Please follow the chapter ‘ THE BEGINNER’S PLAYGROUND’ in the ‘musical questions’ section of this FAQ, you will then be guided step by step.
Now, how to read the Session Window :
The mode are written on a vertical scale from bottom ( low notes) to top ( high notes).
Very important : each square is a semi-tone, and that will be your guide all the way ! this clear view of intervals is what will help you what to sing. If you have no clue of intervals, it’s ok you can use the keyboard to discover the modes.
![]()
The real notes of the mode are written on the very 1st left column, as you can see.
Multiple modes view :
Each column is a mode that is working exactly as described above. From left to right you can view the successive modes/chords of the song.

So basicly you have several possible moves in the grid :
. when you are in a current mode, you can move up or down inside the mode
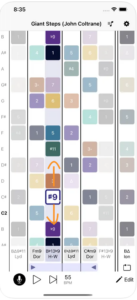
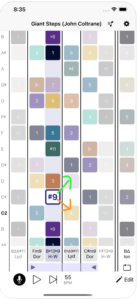
. when the chord is changing, you can move up (in green below) or down (in orange) to the closest note of the next mode.
It is just diagonal because you combine move a semi-tone + switching mode.
1. Go to the standard section of the library, pick up the tune you would like to edit
2. drag the stripe of the tune to the left and copy them to ‘ my songs’

3. go to the ‘my songs’ section of the library, where you will find a copy of the song and EDIT it from there
1.Open the song you would like to transpose and go to ‘Edit’
2. In the edit section tap the multiple selection button :
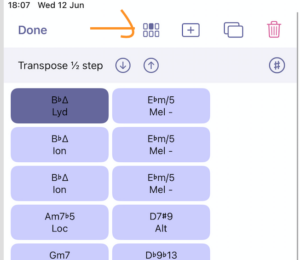
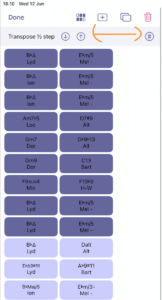
3. select the 1st and last bars of the section you would like to transpose (or of the whole tune if you would like to transpose the whole tune), the whole section will appear in dark. Then use the arrows to transpose by semi-tones , and the b/# to change the key if necessary.
On both your songs and standards, you can loop a section of the song to focus on it, this way :
Grab the left and right purple arrows and place them at the begining and end of the section you would like to work on.

In the IOS version of MelodEar YES ! On Androïd not yet , but it will soon !
How do I create a new chord on IOS ?
1.Go to the Edit window :

2. In the Edit window, press the + next to the chord title :
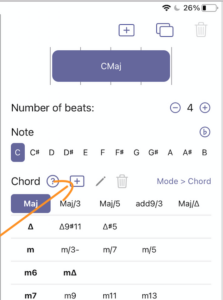
3. In the create chord window :
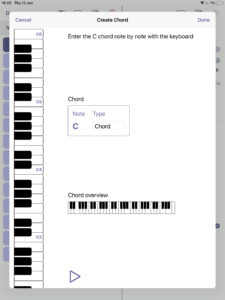
. Enter the notes of your chord as it would be in C with the vertical keyboard ( you can preview it with the play button), and give it a name.
After doing this , the chord will be in your chord options permanently , you will be able to use it with any note and its compatibility with the modes will be all taken care of by MelodEar.
In the IOS version of MelodEar YES ! On Androïd not yet , but it will soon !
How do I create my own mode on IOS ?
1.Go to the Edit window :

2. In the Edit window, press the + next to the mode title :
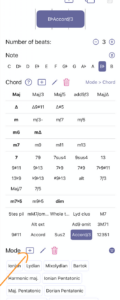
3. In the create mode window :

4. Create your mode by shifting the notes of the default mode , and give it a name. You can do everything you want : add notes, remove some, rename them…
. Give it a name and you’re done !
Once you created your chord, it will be in your mode options permanently, and its compatibility with the chords of the library.
Technically yes, MelodEar allows it.
BUT we strongly recommend the use of wired earphones for a very simple reason : the bluetooth will add an important latency to the pitch recognition, and will be at its best with wired earphones !
Again, it is possible on IOS , not yet on Androïd because we did not figure out the solution yet.
On IOS :
1. On the device 1 Go to your files > find the ‘MelodEar’ file > choose the file called ‘ track.json’
2. Send this file to your device 2. Once it’s in you will have all the current tunes you have on device 1 accessible in your library
We recommend that you always create your songs from the same device and transfer them regularly to the other one, always in the same direction to avoid confusing situations.
Sorry this is a weak spot of MelodEar, we will try to fix this in the future
Do it from this part of the Edit window , choose the number of beats for each chord :
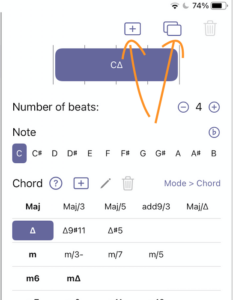
 is the major 7th ( seventh)
 7 is the minor 7th
MUSICAL QUESTIONS
YES, absolutely ! You can really start from scratch with MelodEar, you just need a little guidance, the use of your Ear and the vocal keyboard in MelodEar. The musical understanding will come step by step on the way.
We are aware that the interface of MelodEar can be impressing because all the layers of complexity are appearant at once. You may be facing a huge number of names and notions to process, and be overwhelmed, or just tell yourself it is not for you because you don’t understand anything to the chord symbols, the modes names, the interface even… But the good news is that you can ignore all that names and stuff , and just go straight to the practice !
Please follow the next chapter ‘ BEGINNER’S PLAYGROUND’
The 1st key is to have fun learning the basics. For starters, we suggest that you totally limit your playground to a single-mode practice. It is a wonderful opportunity to play with the mode colors and learn the basic intervals at once !
Melodic modes to music are like colors to painting : wonderful expressive vectors of expression. Your palette of melodic modes in your ear is your palette of colours !
We do recommand that you read the minimum theory-pack (next subjec in the FAQ) but if you want to dive in NOW , you have 2 ways to it :
1. Use the Practice modes in the library, the order will give you a gradual learning of modes.
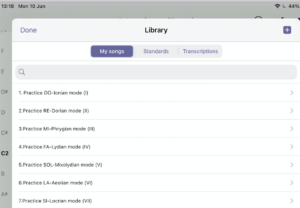
OR
2. Pick-up your own mode
Press the Edit Button

Then press the mode>chord button 
and pick-up a mode you wish to work on in the list.
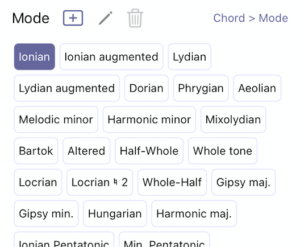
You can preview the mode by clicking on it. Then choose a chord, and you’re ready to go !
( all the chords suggested are compatible with the mode, you can preview them as well).
A melodic interval is the melodic distance between 2 notes in the low / treble range.The elementary ( the smallest ) interval in occidental music is the semi-tone. There are small and big intervals but for now you just need to know 2 of them : . the semi-tone (small) /. the tone (a bit bigger).
A melodic mode ( or scale ) technically is a particular sequence of notes separated by Melodic intervals ( mostly tones and semi-tones), that gives a particular expressive color to the music. You can play with these notes up and down , but also skip notes and create melodic phrases with these notes , shuffling their order. ( e.g : I can play or sing the phrase 1-5-2-4-3= C-G-D-F-E). So a mode is definitely a playground in itself and an infinite well of melodies !
In MelodEar the notes of the modes are expressed in numbers, from bottom (low notes) to top ( high notes). Each square is a semi-tone , which is an absolute key to rely on when you sing using the grid :

Even if you have no clue of how to sing a semi-tone or a tone, you will learn to sing and distinguish them over months using the vocal keyboard.
The vocal keyboard : you can press any colored square to be able to hear the note of the square. By this process you can learn any mode.
A chord is a set of notes played simultaneously. Chords are played on the piano in MelodEar.
Chords and Modes
To put it very simply, in music, chords match modes and modes match chords. Chords give it a harmonic landscape and Melody can be seen as the front narrative line. They play together beautifully in all kinds of music, but specially in jazz, were we tend to give each chord a special mode to enrich and open the improv as much as possible.
In MelodEar you can either start choosing a Melodic mode you want to work on, and then a chord matching the mode / or / choose a chord and then choose a mode matching the chord. Either way switching with the mode>chord Button in the Edit window :

But of course any mode cannot match any chord. In MelodEar the compatibility between chords and modes is totally taken care of, so you don’ t have to worry about it or to know theory, you can choose any element suggested in the list according to your ear’s taste.
- TIP n°1 : EVERY ONE : SING ! ..Specially if you are an instrumentalist, and even if you think your voice is crap ! Singing is really the direct expression of what you actually hear, you can’t cheat with singing. So go for it if you can ! That’s how you will improve the most.
- TIP n°2 : START WITH SINGLE MODE PRACTICE don’t go to standards, they are the end of the process. See chapter ‘ the beginner’s playground’
- TIP n°3 : GET RHYTHM OUT OF THE WAY : Use the skip button and go at your own pace
 Don’t try to sing phrases in real time or to be rhytmic. It will just keep you out of the good zone forever. You really need all the space and time to establish the connexions in your EAR & VOICE, hearing the chords , adjust your pitch very deeply, acknowledge the note you are singing etc… Go real slow and try to connect the numbers, your ear and the choices you make. Like an improv but in slow motion.
- TIP n°4 : TARGET and SING the NUMBERS and phrases ( see chapter ‘ Observe what I sing vs decide what I sing’ in this section of the FAQ)
- TIP n°5 : Work gradually : before going to a new song with several modes you are not familiar with, work the modes separately in single-mode practice. Work the mode transitions by pairs before doing the whole grid. ( lesson 7).
- TIP n°6 : Change the note rather than the number when you did a mistake. Let’s say you wanted to sing 6 but you actually sung 5 spelling ‘6’. Keep your 6 and try to sing the actual 6 rather than repeating the same note you did and spelling 5 instead. Maybe you sung 5 because you did note have 6 in your Ear, so it’s certainly better to try and find what you don’t have.
- TIP n°7 : Use the MelodEar Training HERE , and specially make sure you watch LESSON 7 ‘ Breaking down the chord progression’ before you start working with more than one single mode.
The compatibility chord(s) > mode(s)
In MelodEar you can either start choosing a Melodic mode you want to work on, and then a chord matching the mode / or / choose a chord and then choose a mode matching the chord. Either way switching with the mode>chord Button in the Edit window :
Of course any mode cannot match any chord.
But In MelodEar the compatibility between chords and modes is all taken care of, so you don’ t have to worry about that, you can choose any element of the suggested chords and modes according to your ear’s taste…
But since you ask 🙂 : basicly a chord matches a mode because the notes of the mode include the notes of the chord.
Introduction : it would be interesting to simply ask what it is to ‘ learn’ a melodic mode. I would say the final purpose would be to be able to improvise freely in this mode’s color without any thinking. It’s certain that you already have this with a lot of simple modes. But it is also very likely that a new mode with a new melodic color will require a little process ( fighting familiar habits to get to a new zone). And it’s at that point that you may need a tool like MelodEar.
3 steps to learn a new mode :
Step 1 :Play, Hear & Memorize the mode
. Open the new mode you want to work on in the session window ( check ‘the beginner’s playground chapter if necessary)
. auto-play the chord ( you can adjust the chord and the voice volumes in the settings)

. Play the mode with the vocal keyboard : tap each coloured square of the mode slowly from the bottom 1 to the top 1 and listen carefully the color of each note
. Repeat this several times and gradually sing along with the support of the keyboard
. Gradually remove the keyboard until you can sing the mode by yourself with just the chord
you can repeat the process later on if necessary for long-term memory.
Step 2 : Have a litle walk in the mode
. Sing the mode up and down, change direction at different points of the mode , and try to explore beneath the bottom 1 note and beyond the top 1
Step 3 : Improvise by Ear trying to stick to the mode’s colour. If your not sure , repeat step 2 until you have no doubt.
For Steps 2 and 3, you can refer to Lesson 2 of the MelodEar Training. (Meet and master a new mode).
Advanced exercises on single mode practice in lesson 3 to 6 !
LEVEL 1- SINGLE MODE PRACTICE
see the chapter ‘ the beginner’s playground’ in the ‘musical questions’ section of this FAQ.
Watch Introduction and Lesson 1 in the MelodEar Training
skills associated :
. being able to read and memorize a single mode
. improvise on the mode singing the numbers
. improvise in the mode without reading, just by ear
. being able to distinguish and sing tones (1 square between the notes) and semi-tones ( no square between the notes). This skill will allow you to be a good reader. Be patient : this skill will come gradually : the more modes you know, the better you will be at reading.
LEVEL 2 : BI-MODE PRACTICE
Learn switching between 2 modes is a great and necessary way to smoothly get familiar with the crossmode work !
. learn all the melodic pathways between the 2 modes in your Ear ( lesson 7 of the MelodEar Training)
Use the skip button between chords, so you can take all the necessary time to find the next note when you switch mode

. Improvise between the 2 modes with the skip button
. Gradually add more modes ( 3, 4, 5)
LEVEL 3 : JAZZ STANDARD PRACTICE
same method as in lesson 7 . always start to work on the passages from one mode to the next in the tune before you play in the whole standard.
LEVEL 4 :
. master intervals in the mode ( lesson 2,3,4 in the MelodEar Training )
. Master chromatisms ( lesson 5)
. Mastermelodic patterns ( lesson 6 )
first in a single mode
second in the bi-mode practice
3d in a jazz standard
For each of this levels of practice , I think it is great and healthy to alternate 3 ways of working :
1 singing the numbers / 2 still reading but not naming the numbers anymore / 3 singing by ear
Here it is not a gradual difficulty thing between 1 and 3, it’s just that each way of working has its own specific quality for the learning.
1. singing the numbers : is great to clarify what you are doing and also planting the seeds in your memory. Overmonths, singing the numbers will get you memorize naturally the degrees of the modes. Be careful not to rely too much on the reading though, and make sure you rely on your harmonic ear to relate to the chord and the mode.
2. still reading but not naming the numbers anymore : is the perfect transition between 1 and 3 🙂
3. singing by ear : is the reality check : if you Ear has worked properly, you should after a while be able to do by ear what you did with the reading, thanks to body and ear memory. If there is nothing left when you work by ear, it maybe that you need to consolidate more 1 and 2, OR that you rely too much on the read
- THE HARMONIC RESET: when the chord is changing , something highly important is happening in the music : the whole harmonic landscape is resetting. Before considering anything technical, your Ear just has to : a.Be fully there when it happens, to get all the informations held in the chord /b. Wait long enough to fully scan the new mode. This is not mental it is about hearing.
- keeping the last note in mind : During this reset you need to kind of keep in your ear the note you are leaving on the previous mode, because you will have to measure the move to the next mode from this note.
- Once you have chosen which note of the new mode you want to target, you really need to hear it innerly before you sing it. If there is nothing there and you sing anyway you will just slide your way out and make no connexion at all. So wait until the note is there.
- Finally sing and acknowledge the note in the chord. Adjust it if you need to until it is crystal clear. Your memory will work better with clarity.
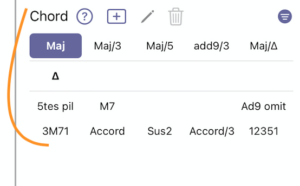
It is possible that the chord you are looking for is not in MelodEar, but it is very likely that it is registered under a different name.
1. If you can’t find the chord you are looking for, try and tap the button here in the edit chords & modes window :

It will show you the different names of the same chords here :

For starters it is important to mention that it is in project to implement the moveable do System in MelodEar in the future ! because I know a lot of you would prefer to have the possibility to work with a constant tonal center.
constant tonal center would mean that the 1 would be always the note of the current key. And the different modes of your tune would be expressed in relation to the 1 of the tonal center, and not from the 1 of each chord independantly.
This being said, I would like to explain why this method is using the current system where 1 is always the fondamental note of the current chord/mode.
I really think that we don’t want to try to prove that one system would be better than the other, but to just examin the + and – of each system. So I will try to demonstrate why the current system for me is developing more advantages in the learning process.
If I totally understand that it makes more sense for educated instrumentalists like that already are aware of the notes place in the harmony ( for instance on a A7 you know immediately that Bb is the b9 of the chord), this system would be more confusing for singers or people with no notions of harmony. With the current system they can know in a glance which note of the mode they are singing, and so know how it should sound. ( I dont sing a 6th the way I will sing a #9). I think it’s something singers will understand more easily. I think instrumentalists have a lot to gain here too, because for some reason I’m almost certain that experiencing the physical print of the each note gives density, musicality and strengh to each note you play on your instrument, because you feel it in your bones and Ear.
– it also stabilises the color prints of the notes & modes, as well as the musical intercourses for the memory to process them. Each time you sing a 6th on the dorian mode for instance, it sounds the same. So it’s way easier to memorize than being on a note and not really ( or always) knowing what is this note in the harmony. It also stabalises the memory of prhases. The same phrase on a given chord is always numbered the same , as oposite to the notes system.
But again, I totally agree your point : the current interface of MelodEar is not showing the tonal intercourses of the chords. But I can assure you that on a practical level, it’s really powerful to do this work. I’ ve been using this method for 15 years now , with singers & instrumentalists, and at the end of the day the language is secondary : by doing this things start to change very deeply.
Pour commencer je précise que c’ est en projet d’ implémenter un référentiel tonal constant dans MelodEar dans le futur ! Parce que je suis conscient que beaucoup d’ entre vous aimeraient avoir la possibilité de travailler comme cela.
Un référentiel tonal constant ça veut dire que le 1 ( ou le DO) serait toujours à la même place, celle de la tonalité, et ne varirait pas d’ un mode au suivant. Et les différents modes de votre morceau dans MelodEar seraient exprimés par rapport au 1 du centre tonal, et non en se calant sur la 1ere note de chaque mode indépendament. Je comprends, ce système serait plus simple et plus synthétique pour l’ esprit, en apparence, car il fait le lien entre tous les accords. C’ est rassurant.
Ceci étant, je voudrais t’ expliquer pourquoi avoir fait le choix de ce système où le 1 change à chaque mode/accord.
Je pense vraiment que le but n’ est pas de prouver qu’ 1 système soit mieux que l’ autre, mais simplement d’ examiner les avantages et les inconvénients de chaque système en fonction du profil de l’ apprenant et des objectifs. Donc je vais essayer de t’ expliquer pourquoi j’ ai fait ce choix, qui est trés conscient.
1.La facilité de mémorisation pour les chanteurs
L’ axe de travail ici c’ est d’ assimiler les modes et les couleurs de notes dans notre mémoire profonde.
Si le système tonal à référentiel constant paraît plus simple d’ entrée de jeu, il faut bien avoir conscience qu’ un simple mode, selon d’ où il part dans la tonalité pourrait avoir jusqu’ à 12 écritures différentes. On imagine donc le casse-tête pour mémoriser et comprendre tout ça.
Ici , chaque mode, note, phrase au sein d’ un mode portera toujours les mêmes chiffres. La mémorisation de ces modes, phrases, couleurs ne peut se faire que si elles portent toujours le même nom et dans toutes les situations.
2. La conscience et la mémorisation des couleurs de notes et des couleurs de modes
Savoir sur quelle note on est dans l’ harmonie ou dans le mode a un deuxième avantage fondamental :
Comme à chaque fois que l’ on chante ou joue une note on dit son chiffre en même temps, et que la couleur de cette note va toujours être la même quelque soit sa hauteur, cela va à terme créer un réseau de mémorisation et des liens à longs termes jusqu’ à créer un système interne complètement solide, où vous serez toujours conscients de ce que vous chantez dans l’ harmonie, même à l’ oreille. Cela serait in-imaginable dans le système tonal.
3. l’ importance musicale et artistique de savoir ce qu’ on chante / joue dans l’ harmonie :
Je pense que c’ est artistiquement et musicalement fondamental de savoir quelle note de l’ accord en cours on est en train de chanter , pour l’ intelligence harmonique du discours, pour la justesse, pour la conscience musicale, la sensation profonde et expressive de la note. Et j’ irai même plus loin : c’ est important de viser certaines couleurs de notes. Car une phrase mélodique est belle, pas seulement parce que sa forme, son dessin sont jolis mais aussi parce qu’ elle passe par des notes savoureuses dans l’ harmonie, jouées ou chantées et mises en valeur à dessein ! On ne peut pas jouer au hasard sur une gamme tonale en permanence en ignorant les accords !
Donc si tout est en système tonal , on serait peut être davantage renseigné sur ce qu’ on joue dans la gamme de la tonalité, mais on est complètement à l’ aveugle sur la places des notes que l’ on chante/joue dans l’ harmonie, ou alors il faut faire un calcul constant pour le retrouver ce qui ne nous facilite facilement pas la tâche.
Donc pour résumer, le système de MelodEar est plus avantageux, efficace, et simple si on ignore la nécessité de chanter les notes en conscience de leur place dans l’ harmonie, mais beaucoup plus pratique si l’on souhaite cultiver cette conscience, ce qui est à mon sens fondamental.
Let’s put something very clear : the work here is NOT to learn to read music, even if it can definitely be a valuable side effect of practicing with MelodEar.
It is really about developing your Harmonic Ear in the form of 2 main skills :
Skill 1 : Harmonic sensitivity to a chord
Develop a sensitive Harmonic Ear means that your Ear learns to deeply and accurately identify what is there in the chord, and instinctly use this information to find the relevant mode. This is more an impregnation than an intellectual process.
Skill 2 : When the chord/mode changes I know where to go up or down to the closest note
This skill is something that is not often discussed in the learning of improvisation, and yet I think it is very helpful to be able to flow throught harmonies. These melodic passages + your ability to switch consciously from one mode to the next in your Ear is what will allow you being totally free improvising through harmonies.
Again it is not an intellectuall process, more an Ear organic process.
So why do we need to read and sing the numbers then ?
Here comes the subtle part : Yes the purpose is to just get a sensitive harmonic ear, but the process needs some reading , why ? :
. The reading is a way to control what you sing and being able to sing things that you wouldn’t sing naturally at 1st . Of course it will get natural later. To put it differently : if you don’t read you will always rely on the same brain/ear connexions. When you want to create new connexions, or learn new things, you need to have a very reliable instrument that will be stronger than what your old habits want to drag you in. This is the reading.
. When you do the harmonic ear work, sometimes , specially if you work right, you will have times when your ear does not have the melodic answer. A hole. A blank. This blank or hole is actually a good news : it is an invitation to create a new connexion. But you don’t want to be pro-active in filling this blank. You need to focus and wait , in the passive, that the answer comes naturally. The reading will help supporting this process too, but it’s not supposed to replace the process !
Important special mesage for sight-readers :
You guys are so good at reading intervals that you will need to be extra-careful to make sure that your harmonic ear is working.
I actually had many times sight-readers students that were super at ease when reading the MelodEar’s grid and singing the numbers, and that were completely lost in the void when they were supposed to work by ear afterward with the same chord progression. That meant that they were relying far too much on their reading in the first place, and not enough using their harmonic ear.
So if you are a sight reader, you almost need to self-hack yourself to really do the ear work, like this :
. In the ‘ reading’ sessions in MelodEar, when you move from one note to the next , rather than picturing yourself that you are going 1 tone or 1 semi-tone up or down, try to just ask your ear to find the closest not according to what you hear in the chord. Ignore the interval you see. I know this is crazy but it’s the only way to really work your Ear.
. Work very often by Ear , at each step of the work to make sure your ear is memorizing things.
This is the reality check : when you work by Ear that’s when you see if your harmonic Ear has worked or if you were too much in the reading.
- It is the best instrument to secure your learning process : The reading is a way to control what you sing and being able to sing things that you wouldn’t sing naturally at 1st . Of course it will get natural later on, and you will just play with it. To put it differently : reading will help you create new brain/ear connexions. When you want to create new connexions, or learn new things, you need to have a very reliable instrument that will be stronger than where your old habits want to drag you in. This is the reading 🙂
- It is a great way to memorize the harmonic color of the notes. Overtime if you practice a lot, you will often sing some 7 , 6 , 2 in very different situations ( different modes, different mode changes etc). I think that singing the number each time is a wonderful way to get them in your body and ear and to connect your cousciousness to your harmonic ear.
- Finally , it’s the best way to really work, because you will start to really target some notes and try and sing them. It can appear a detail but this is so important ! So important that it is detailed in the next chapter ‘OBSERVE WHAT I SING VS DECIDE WHAT I SING’
When you discover MelodEar, it feels good to observe what you sing naturally being displayed on the screen with the pitch recognition. And this is so fun. I get it ! And it’s also a very good way to understand what you do, be more aware of your phrases and intervals.
However, if your really want the muscle to work out, you need to choose things 1st and try to sing them. This is where the work really starts because now you will put yourself outside your comfort zone. You decide something and when trying to realize it , your mistake will show you what you dont’ know and you can just try and repeat until you have it.
